Step 1) Create a ASP.NET 4.0 WEB APPLICATION
Step 2) Once ASP.NET WEB APP Created, Open VS2010 command prompt
or
located in C:\Program Files (x86)\Microsoft Visual Studio 10.0\VC\vcvarsall.bat

Type aspnet_regsql.exe(as shown above)
following screen will appear


<connectionStrings>
<add name="SessionInSql" connectionString="server=localhost;database=aspnetdb;trusted_connection=yes;"
providerName="System.Data.SqlClient"/>
</connectionStrings>
Step 2) Once ASP.NET WEB APP Created, Open VS2010 command prompt
or
located in C:\Program Files (x86)\Microsoft Visual Studio 10.0\VC\vcvarsall.bat

Type aspnet_regsql.exe(as shown above)
following screen will appear

Press Next button

Select Configure SQL-Server for application services --> Click Next button

Enter Server Name, select Windows Authentication or enter user name & password.
Leave <default> for database--> Click Next Button

In this Sql-Server Name: Sp2010
Databasename: aspnetdb
Click Next Button --> FINISH
Step 3) Open SQL-Server Management Studio
aspnetdb database and tables will be displayed.as shown below.

Step 4) So far We have added membership,role management & profile management support only.
Now add session tables to aspnetdb by typying
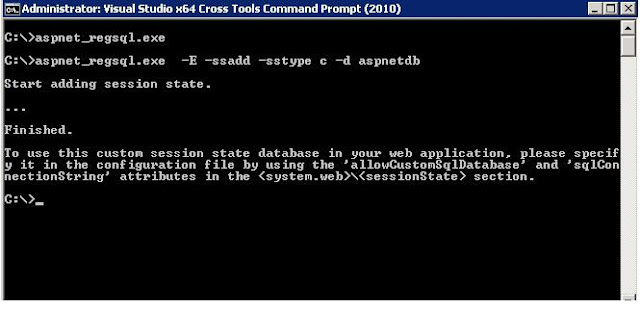
C:\>aspnet_regsql.exe -E -ssadd -sstype c -d aspnetdb
-E for windows authentication
-ssadd for session support in db
-sstype is custom
-d is for database where session tables are stored(in this case aspnetdb).

Step 5) Go to Web Application created in Step1)
Open web.config
add connection string + sessionstate
as shown below
<connectionStrings>
<add name="SessionInSql" connectionString="server=localhost;database=aspnetdb;trusted_connection=yes;"
providerName="System.Data.SqlClient"/>
</connectionStrings>
<system.web>
<sessionState mode="SQLServer"
allowCustomSqlDatabase="true"
sqlConnectionString="SessionInSql">
</sessionState>
</system.web>
Step 6) Testing Session state. follow this tutorial
Test Session State
Step 7) Once session is created in SQL-Server the following tables will be populated.(as shown below)

Step 6) Testing Session state. follow this tutorial
Test Session State
Step 7) Once session is created in SQL-Server the following tables will be populated.(as shown below)

No comments:
Post a Comment